Receive and publish data on the internet using MQTT Communication using Mosquitto
The Internet of Things (IoT) has revolutionized the way we interact with our environment. ESP8266, a popular Wi-Fi module, has become a staple in IoT projects due to its compact size, low cost, and ease of use.
One of the key aspects of IoT is communication between devices and servers. MQTT (Message Queuing Telemetry Transport) has emerged as a lightweight and efficient protocol for transmitting data over the internet. In this blog post, we’ll explore how to establish communication between an ESP8266 and an MQTT broker, enabling you to build robust and connected IoT projects.
Understanding MQTT
MQTT is a publish-subscribe-based messaging protocol that allows devices to communicate with each other using a central message broker. It was designed to be lightweight and efficient, making it ideal for IoT applications, especially those involving constrained devices with limited processing power and bandwidth.
At the heart of MQTT lies the publish-subscribe model. Devices (publishers) send messages, known as “topics,” to the broker. Subscribed devices (subscribers) receive these messages if they have expressed interest in the corresponding topic. This decoupling of communication allows multiple devices to communicate without needing to know each other’s identities.
Using MQTT for IoT communication with the ESP8266 offers several advantages:
- Lightweight: MQTT’s minimal overhead ensures efficient data transmission, making it suitable for low-power devices with limited resources.
- Scalability: MQTT’s publish-subscribe model enables easy scalability, as adding new devices or subscribers doesn’t affect the overall system.
- Real-time Updates: IoT applications often require real-time data updates, and MQTT’s low latency ensures timely message delivery.
- Reduced Bandwidth: MQTT’s small packet size reduces data usage, ideal for scenarios where bandwidth is limited or costly.
Mosquitto to the rescue!
To enable MQTT connection we need an MQTT broker. An MQTT broker acts as a server centralizing MQTT communication from/to many clients. Many tutorials recommend using SaaS MQTT brokers, but if you just want to deploy something on your Raspberry or VPS you can quickly get away with it using Mosquitto.
Mosquitto can be installed and launched in 10 seconds:
sudo apt install mosquitto mosquitto-clients
Then:
sudo systemctl start mosquitto
To test that it’s already working you may open 2 different terminal sessions:
1st session (publisher):
mosquitto_pub -h localhost -t "test" -m "hello world"
2nd session (subscriber):
mosquitto_sub -h localhost -t "test"
If you got “hello world” on the subscriber session, you’re good to go!
Protecting Mosquitto with Username and Password authentication
The Mosquitto broker is meant to be reached from the Internet, therefore it’s always a good idea to protect it using username/password credentials. To do so, we first generate a password file using Mosquitto utilities:
mosquitto_passwd -c passwordfile esp8266
Now, we move it to where the Mosquitto configuration is:
mv passwordfile /etc/mosquitto
Lastly, we tell Mosquitto that all the communications will be, from now on, password protected. So open /etc/mosquitto/mosquitto.conf with your favorite editor and add the following line:
password_file /etc/mosquitto/passwordfile
Done!
An ESP8266 MQTT example: a rolling dice :)
We are going to build a simple MQTT example on our ESP8266 by making it acting as a rolling dice. Here’s the idea:
- ESP8266 will connect to the MQTT broker and will subscribe to the
esp8266/dicetopic - We’ll publish a “roll” message on the
esp8266/dicetopic from our Computer - As soon as our ESP8266 will receive a “roll” message, it will generate a random number between 1 and 6, and it will publish it
- From our Computer we’ll be able to see the number generated by our ESP8266
Sounds cool, right?
Installing the MQTT client library on the ESP8266
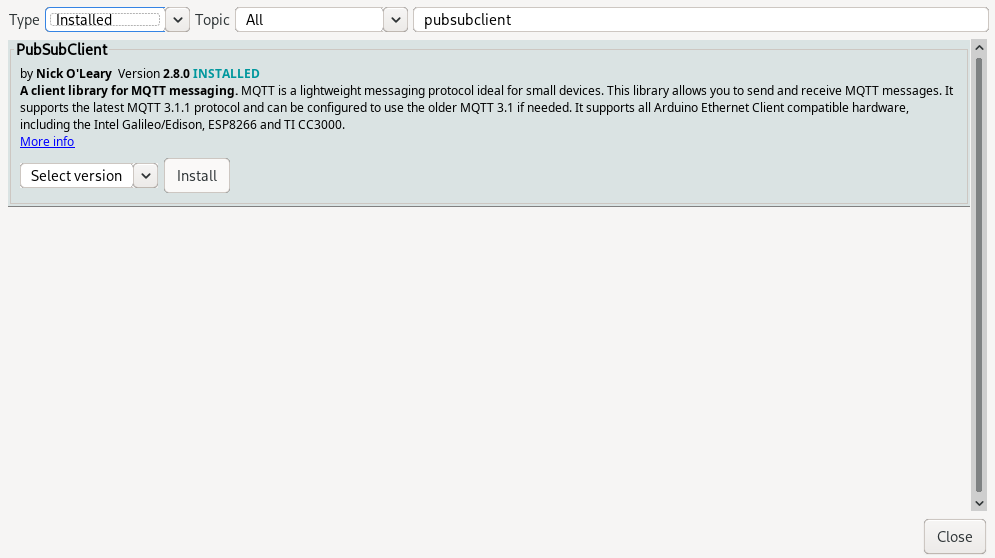
We need an MQTT client for our ESP8266. Our best bet is this one. To install it, simply open your Arduino IDE and click on Tools/Manage Libraries.

Alternatively, you can do it by either cloning the repository, or by downloading it as a ZIP file. Make sure to clone / extract it into the Arduino libraries folder.
Here’s where you can find the libraries location based on your OS:
- Windows:
C:\Users\{username}\Documents\Arduino\libraries - MacOS:
/Users/{username}/Documents/Arduino/libraries - Linux:
/home/{username}/Arduino/libraries
The code
Let’s take a quick look at the code for our ESP8266:
#include <ESP8266WiFi.h>
#include <PubSubClient.h>

const char* ssid = "YOUR_WIFI_SSID";
const char* password = "YOUR_WIFI_PASSWORD";

// Replace with your MQTT broker address
const char* mqtt_server = "YOUR_MQTT_BROKER_IP";
const int mqtt_port = 1883;
const char* mqtt_username = "YOUR_MQTT_USERNAME";
const char* mqtt_password = "YOUR_MQTT_PASSWORD";

const char* mqtt_topic = "esp8266/dice";

WiFiClient wifi_client;
PubSubClient mqtt_client(wifi_client);

// Callback function to handle incoming MQTT messages
void callback(char* topic, byte* payload, unsigned int length) {
  // Handle the incoming message here
  Serial.print("Received message on topic: ");
  Serial.println(topic);

  // Convert the payload byte array to a string
  char message[length + 1];
  strncpy(message, (char*)payload, length);
  message[length] = '\0';

  // Print the message
  Serial.print("Message received: ");
  Serial.println(message);

  if (strcmp(message, "roll") == 0) {
    String random_value = String(random(1, 7));
    char buffer[2];
    random_value.toCharArray(buffer, sizeof(buffer));
    mqtt_client.publish(mqtt_topic, buffer);
  }
}

void mqtt_connect() {
  while (!mqtt_client.connected()) {
    Serial.println("Connecting to MQTT broker...");
    if (mqtt_client.connect("ESP8266Client", mqtt_username, mqtt_password)) {
      Serial.println("Connected to MQTT broker");
      // Subscribe to the topic
      mqtt_client.subscribe(mqtt_topic);
    } else {
      Serial.print("Failed with state ");
      Serial.print(mqtt_client.state());
      delay(2000);
    }
  }
}

void setup() {
  Serial.begin(115200);
  delay(10);

  // Connect to Wi-Fi
  Serial.println();
  Serial.print("Connecting to ");
  Serial.println(ssid);

  WiFi.begin(ssid, password);

  while (WiFi.status() != WL_CONNECTED) {
    delay(500);
    Serial.print(".");
  }

  Serial.println("");
  Serial.println("WiFi connected");
  Serial.println("IP address: ");
  Serial.println(WiFi.localIP());

  // Connect to MQTT broker
  mqtt_client.setServer(mqtt_server, mqtt_port);
  mqtt_client.setCallback(callback);

  mqtt_connect();
}

void loop() {
  if (!mqtt_client.connected()) {
    // Reconnect to MQTT broker if the connection is lost
    mqtt_connect();
  }

  // Maintain the MQTT connection
  mqtt_client.loop();
}
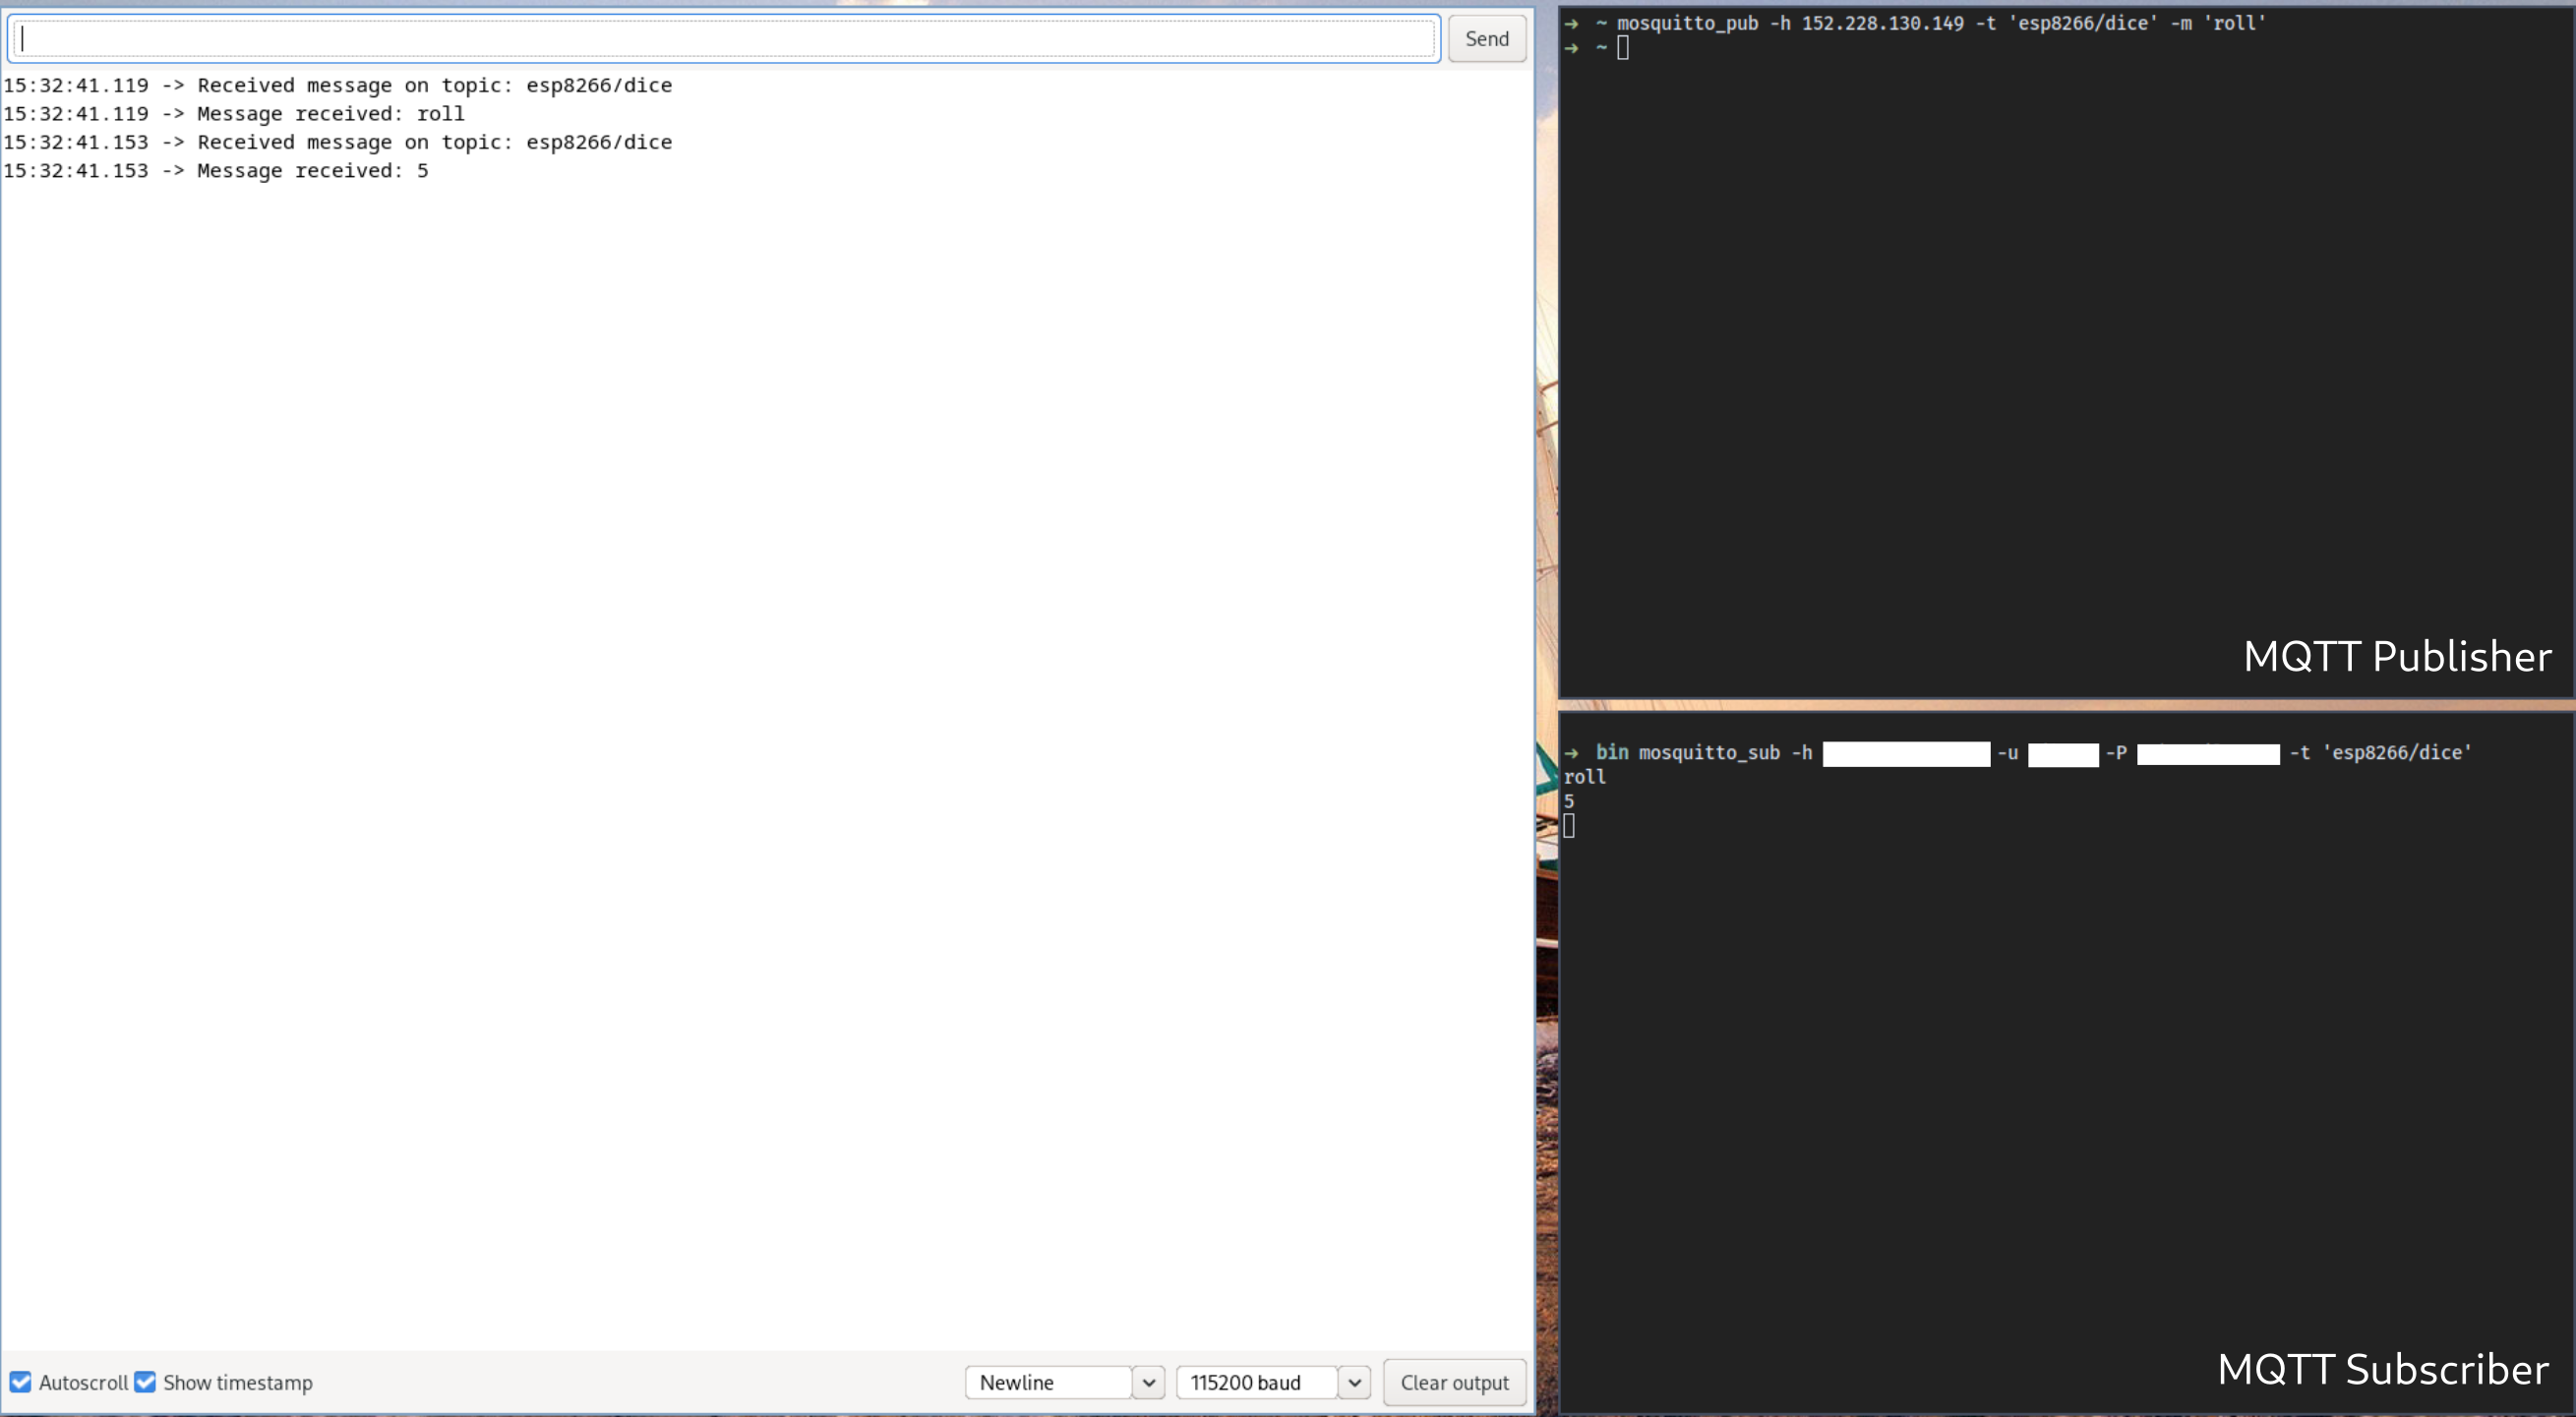
In order to test it, simply spawn 2 terminal sessions on your computer:
Subscriber session:
mosquitto_sub -h YOUR_MQTT_BROKER_IP -u YOUR_MQTT_CLIENT -P YOUR_MQTT_PASSWORD -t 'esp8266/dice'
Publisher session:
mosquitto_pub -h YOUR_MQTT_BROKER_IP -u YOUR_MQTT_CLIENT -P YOUR_MQTT_PASSWORD -t 'esp8266/dice' -m 'roll'
If the ESP8266 is working properly, you should see a number showing up in your Subscriber terminal session.

Let’s break it down
We first include the PubSubClient.h library (and the ESP8266WiFi.h to connect to the WiFi):
#include <ESP8266WiFi.h>
#include <PubSubClient.h>
Initialize parameters for WiFi and MQTT connection:
const char* ssid = "YOUR_WIFI_SSID";
const char* password = "YOUR_WIFI_PASSWORD";

// Replace with your MQTT broker address
const char* mqtt_server = "YOUR_MQTT_BROKER_IP";
const int mqtt_port = 1883;
const char* mqtt_username = "YOUR_MQTT_USERNAME";
const char* mqtt_password = "YOUR_MQTT_PASSWORD";

const char* mqtt_topic = "esp8266/dice";
Declare both your WiFi and MQTT clients:
WiFiClient wifi_client;
PubSubClient mqtt_client(wifi_client);
Here we define the function to be called every time the ESP8266 receives a MQTT message:
void callback(char* topic, byte* payload, unsigned int length) {
  // Handle the incoming message here
  Serial.print("Received message on topic: ");
  Serial.println(topic);

  // Convert the payload byte array to a string
  char message[length + 1];
  strncpy(message, (char*)payload, length);
  message[length] = '\0';

  // Print the message
  Serial.print("Message received: ");
  Serial.println(message);

  if (strcmp(message, "roll") == 0) {
    String random_value = String(random(1, 7));
    char buffer[2];
    random_value.toCharArray(buffer, sizeof(buffer));
    mqtt_client.publish(mqtt_topic, buffer);
  }
}
So we simply:
- Extract all the incoming messages
- Print them on the serial bus
- If we get a “roll” message..
- ..Generate a random number and send it over MQTT
For simplicity, we compare all incoming messages (coming from all topics), but that’s easy to fix ;)
Next, we setup a “connect” function, in order to connect our ESP8266 to the Mosquitto broker:
void mqtt_connect() {
  while (!mqtt_client.connected()) {
    Serial.println("Connecting to MQTT broker...");
    if (mqtt_client.connect("ESP8266Client", mqtt_username, mqtt_password)) {
      Serial.println("Connected to MQTT broker");
      // Subscribe to the topic
      mqtt_client.subscribe(mqtt_topic);
    } else {
      Serial.print("Failed with state ");
      Serial.print(mqtt_client.state());
      delay(2000);
    }
  }
}
In the setup function, we simply initialize the Serial bus, connect to the WiFi and connect to the MQTT broker:
void setup() {
  Serial.begin(115200);
  delay(10);

  // Connect to Wi-Fi
  Serial.println();
  Serial.print("Connecting to ");
  Serial.println(ssid);

  WiFi.begin(ssid, password);

  while (WiFi.status() != WL_CONNECTED) {
    delay(500);
    Serial.print(".");
  }

  Serial.println("");
  Serial.println("WiFi connected");
  Serial.println("IP address: ");
  Serial.println(WiFi.localIP());

  // Connect to MQTT broker
  mqtt_client.setServer(mqtt_server, mqtt_port);
  mqtt_client.setCallback(callback);

  mqtt_connect();
}
Lastly, in the loop function we simply reconnect to the MQTT broker if we got disconnected for any reason and process MQTT messages:
void loop() {
  if (!mqtt_client.connected()) {
    // Reconnect to MQTT broker if the connection is lost
    mqtt_connect();
  }

  // Maintain the MQTT connection
  mqtt_client.loop();
}
Done!
Wrappin’ up
MQTT communication plays a vital role in building IoT projects with ESP8266. By establishing a connection to an MQTT broker and subscribing to relevant topics, the ESP8266 can receive and respond to data from other devices and servers.
This opens up endless possibilities for creating smart and interconnected IoT applications, ranging from home automation to industrial monitoring. With the lightweight and efficient nature of MQTT, your ESP8266-powered projects can communicate seamlessly while consuming minimal resources, making it an excellent choice for IoT enthusiasts and developers alike.
Made with ❤️ by Mikepicker