Serve an HTML page to read and write ESP8266 data
In the past article, we’ve seen how to make our ESP8266 serving HTML pages embedded in your sketch. Though the approach works just fine, it typically becomes complex and cumbersome to work with soon enough. Indeed, as your HTML pages increase in size, it can become a tedious task to maintain your code.
There must be a better way.
That better way is called SPIFFS (SPI Flash File System). SPIFFS allows us to store static files (e.g. HTML) on the ESP8266 flash (persistent memory). This leads to a couple of advantages:
- Code is more organized: you don’t have to weirdly concatenate huge HTML strings in your sketch code.
- Sketch code is decoupled from your static data: and that’s another sweet benefit, as we can maintain code and static files independently.
- It becomes easier to develop HTML pages: you can simply work on your HTML on your PC, test it, then drop it on your ESP8266 with a single click.
To interact with the SPIFFS we’ll use an Arduino IDE plugin which takes care of automatically push files to your ESP8266 flash.
We’re going to build a simple WebServer which accepts GET requests, retrieves HTML pages from the SPIFFS, injects some values, then returns it to the client.
Install the SPIFFS Arduino IDE plugin
To enable SPIFFS support on the Arduino IDE, we need to install the arduino-esp8266fs-plugin. To do that, you can either clone the repo or download the ZIP file. Once done, copy the folder inside the tools folder in your Arduino directory.
Here’s where you can find the tools location based on your OS:
- Windows:
C:\Users\{username}\Documents\Arduino\tools - MacOS:
/Users/{username}/Documents/Arduino/tools - Linux:
/home/{username}/Arduino/tools
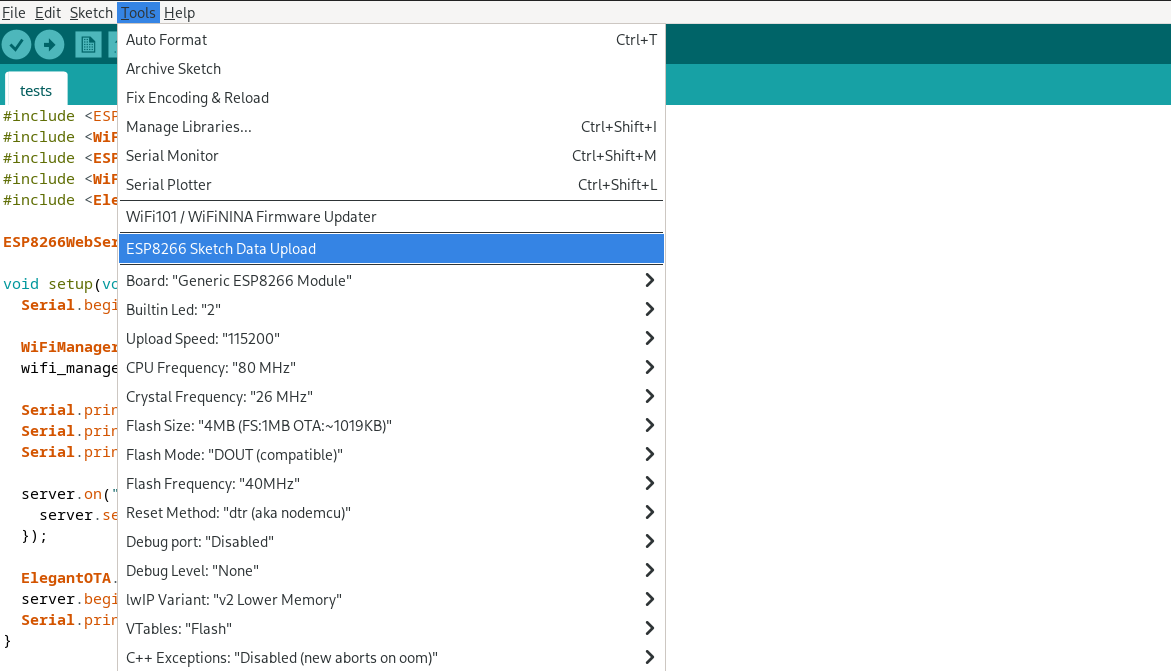
Now if you jump back on Arduino IDE, you should be able to see a new option under Tools named ESP8266 Sketch Data Upload. Once pressed (assuming your ESP8266 board is connected to your PC), the plugin will push to the ESP8266 Flash all the files stored in the data folder in your sketch project files.

We’ll now reuse the HTML page from this post but we’re going to use SPIFFS to store it this time.
The code
Here’s the HTML page we’re going to use:
<!DOCTYPE html>
<html>
  <head>
    <title>ESP8266 Web Server</title>
  </head>
  <body>
    <h1>Mock Sensor Data</h1>
    <p>Temperature: <span id="temperature">--</span>°C</p>
    <p>Humidity: <span id="humidity">--</span>%</p>
    <form method="POST" action="/">
      <label for="name">Name:</label>
      <input type="text" id="name" name="name" required>
      <button type="submit">Submit</button>
    </form>
  </body>
</html>
We’re going to show Temperature and Humidity data in the first two HTML paragraphs:
<p>Temperature: <span id="temperature">--</span>°C</p>
<p>Humidity: <span id="humidity">--</span>%</p>
Then we render a form to retrieve user input:
<form method="POST" action="/">
  <label for="name">Name:</label>
  <input type="text" id="name" name="name" required>
  <button type="submit">Submit</button>
</form>
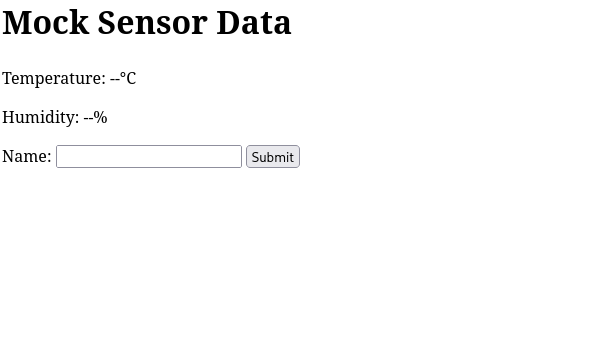
Save this as index.html file on your computer, then serve it locally through a simple webserver (if you have node installed on your pc and you’re on linux, try smashing npx http-server . on your terminal). Now open the browser and check the result, it should look like this:

Store this HTML file under your <SKETCH_FOLDER>/data folder, then on the Arduino IDE click on Tools / ESP8266 Sketch Data Upload. If everything goes right, you shouldn’t see no errors on your Arduino IDE console. At this point your HTML page is stored in your ESP8266 flash.
Now let’s write some code to:
- Spawn a WebServer
- Accepts HTTP requests
- Respond to GET requests with the HTML page
#include <ESP8266WiFi.h>
#include <ESP8266WebServer.h>
#include <FS.h>

// Replace with your network credentials
const char* ssid = "SSID";
const char* password = "PASSWORD";

ESP8266WebServer server(80);

void handleRoot() {
  String html;
  File file = SPIFFS.open("/index.html", "r");
  if (file) {
    while (file.available()) {
      String line = file.readStringUntil('\n');
      if (line.indexOf("id=\"temperature\"") != -1) {
        // Replace with your temperature sensor reading
        line.replace("--", "25");
      }
      if (line.indexOf("id=\"humidity\"") != -1) {
        // Replace with your humidity sensor reading
        line.replace("--", "50");
      }
      html += line;
    }
    file.close();
    server.send(200, "text/html", html);
  } else {
    server.send(404, "text/plain", "File not found");
  }
}

void setup() {
  Serial.begin(115200);
  delay(1000);
  Serial.println();

  // Connect to Wi-Fi network
  Serial.print("Connecting to ");
  Serial.println(ssid);
  WiFi.begin(ssid, password);
  while (WiFi.status() != WL_CONNECTED) {
    delay(1000);
    Serial.print(".");
  }
  Serial.println("");
  Serial.println("WiFi connected successfully");

  // Initialize SPIFFS
  if (!SPIFFS.begin()) {
    Serial.println("Failed to initialize SPIFFS");
    return;
  }

  // Serve the HTML page
  server.on("/", handleRoot);

  server.begin();
  Serial.println("HTTP server started");
}

void loop() {
  server.handleClient();
}
Run this on your ESP8266, check the IP address on the Serial Monitor, open your browser to <ESP8266_IP_ADDRESS>/ and watch your awesome page!
Let’s take a look at the code step by step.
Let’s break it down
We start off by including a bunch of standard libraries:
#include <ESP8266WiFi.h>
#include <WiFiClient.h>
#include <ESP8266WebServer.h>
We define the WebServer instance and WiFi credential constants (to be filled with your WiFi configuration):
const char* ssid = "SSID";
const char* password = "PASSWORD";

ESP8266WebServer server(80);
In the setup() function we:
- Initialize the serial interface (115200 baud)
- Connect to the WiFi
- Initialize the SPIFFS module
- Initialize the WebServer passing the
handleRoothandler.
void setup() {
  Serial.begin(115200);
  delay(1000);
  Serial.println();

  // Connect to Wi-Fi network
  Serial.print("Connecting to ");
  Serial.println(ssid);
  WiFi.begin(ssid, password);
  while (WiFi.status() != WL_CONNECTED) {
    delay(1000);
    Serial.print(".");
  }
  Serial.println("");
  Serial.println("WiFi connected successfully");

  // Initialize SPIFFS
  if (!SPIFFS.begin()) {
    Serial.println("Failed to initialize SPIFFS");
    return;
  }

  // Serve the HTML page
  server.on("/", handleRoot);

  server.begin();
  Serial.println("HTTP server started");
}
We let our WebServer do its job in the loop() callback:
void loop(void) {
  server.handleClient();
}
In the handleRoot() function, will respond to HTTP GET requests with the HTML page retrieved from the flash memory, filling it up with some random values for temperature and humidity:
void handleRoot() {
  String html;
  File file = SPIFFS.open("/index.html", "r");
  if (file) {
    while (file.available()) {
      String line = file.readStringUntil('\n');
      if (line.indexOf("id=\"temperature\"") != -1) {
        // Replace with your temperature sensor reading
        line.replace("--", "25");
      }
      if (line.indexOf("id=\"humidity\"") != -1) {
        // Replace with your humidity sensor reading
        line.replace("--", "50");
      }
      html += line;
    }
    file.close();
    server.send(200, "text/html", html);
  } else {
    server.send(404, "text/plain", "File not found");
  }
}
Specifically, we load the file:
File file = SPIFFS.open("/index.html", "r");We loop over every line:
while (file.available()) {We read the line:
String line = file.readStringUntil('\n');We find the temperature and humidity HTML tags and we fill them up with random (sensor) values:
if (line.indexOf("id=\"temperature\"") != -1) {
    // Replace with your temperature sensor reading
    line.replace("--", "25");
}
if (line.indexOf("id=\"humidity\"") != -1) {
    // Replace with your humidity sensor reading
    line.replace("--", "50");
}
html += line;
Then we close the file stream and ship the HTML to the client:
file.close();
server.send(200, "text/html", html);
Wrappin’ Up
SPIFFS allows our tiny ESP8266 box to start acting like a computer: it mimics a File System, allowing us to write more clean and maintainable code. The only “downside” is that Arduino IDE will now produce 2 BIN files under the hood: one for the sketch, and one for SPIFFS. That’s entirely transparent to you when prototyping with Arduino IDE, while you have to remind about this when you’re about to flash your firmware to your “production” ESP8266 boards.
Anyway, that’s not an issue! Because you can rely on ElegantOTA to upload both the sketch and SPIFFS firmwares over-the-air!
Thank you very much for reading up!
Made with ❤️ by Mikepicker